Tuesday, January 26, 2016

Notebook Makeover.


When sitting in class it's sometimes difficult to stay fully focused. I thought if I had cuter school supplies I would be more motivated (or maybe I just need more sleep)! I decided to do something about this unfortunate circumstance and decorated my notebooks! I did this last semester; however, the notebooks were a different brand and the sharpie I wrote with always got scratched off the cover. This semester, I stood in the notebook aisle at Target and contemplated which type of notebook I should buy for about 15 minutes. I finally decided on the 89 cent ones, even though they were on the 
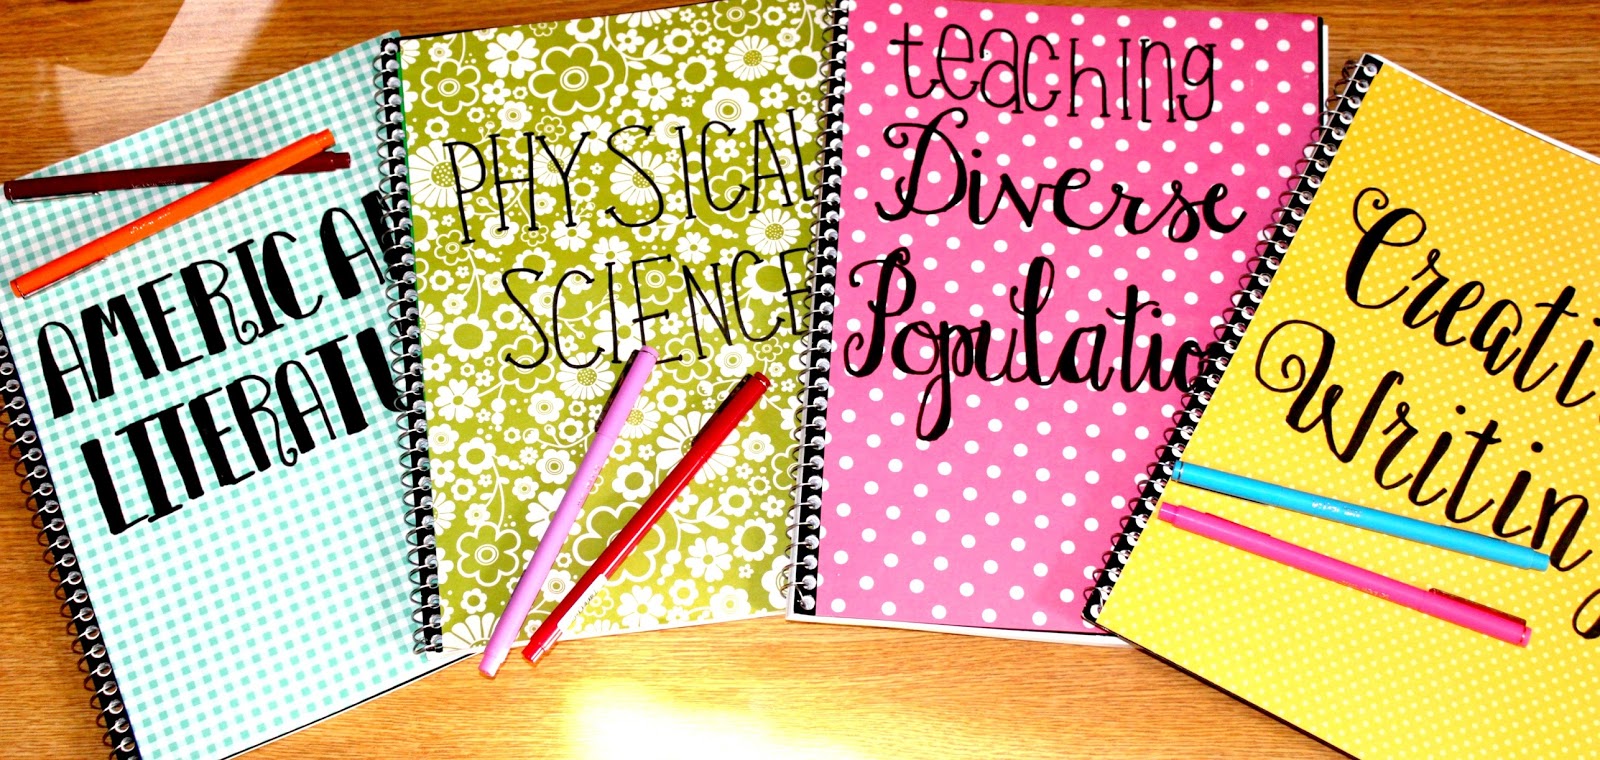
non-attractive side. When I got home I came up with this idea to cover them with scrapbook paper and draw the names of my classes in sharpie. Here is the DIY for creating your own school notebooks!

Find some unused notebooks around your house or buy some new ones. This is how I labeled my notebooks last year and they looked kind of boring in my opinion.


Next pick out a piece of scrapbook paper that you like and cut it to fit the front cover of your notebook. I bought this pack of paper from Hobby Lobby a few years ago when it was on sale. They still sell this specific pack, but it's probably not on sale at the moment. Then put double-sided tape on the backside of the paper in the four corners and then attach it to the notebook.


Once I finished that I realized that there was no pocket inside the front cover. I needed a place to corral my loose papers and handouts, so I decided to add one! I took the remaining piece of paper from the coordinating cover color and measured the length to fit the inside cover of the notebook. I left room at either end of the paper to fold in the edges.


I added another strip of paper to the bottom of the new pocket and then folded it in. After all of the edges and strips were folded and attached, I placed strips of double-sided tape on each edge and attached it to the inside cover of the notebook.


Now you have a new pocket!


For the final touch, I typed each of my class titles in different fonts in Word. Then I freehanded each of the class names on to the coordinating colored notebook.


You’re finished and you can feel more motivated about going to class with your cute new notebook! Thanks for reading and feel free to leave me a comment!


Friday, January 22, 2016

Cupcakes & Target Finds.

Happy Friday! I think that Friday is one of my favorite days of the week, solely because the school week is over and I can finally relax and catch my breath. I also love Fridays because of the fun activities on Friday afternoon and night. This afternoon, I went with my sister to a bakery/cupcake store that just moved locations closer to my school. I loved it! I also love celebrating life and cupcakes are the perfect way to do so! Everything was pink and cute and the cupcakes were delicious! I also love spending time with my sister because I am not able to do that with our busy schedules. Tonight, my school hosted a comedy/improv night and my friends and I decided to go. We weren’t sure what to expect because of the theme name, “Mission Improvable.”  Once the show got started we were pleasantly surprised at how funny it was. Afterwards, we went to Target to have a little fun with retail therapy. While leaving the Improv show, I thought of a cute idea for this post. I received a $30 gift card to Target for Christmas and I thought I would try to find some things each under $30 and share them with y’all. If I had had more time in Target, I would have included more things. Here are some of my favorites!
        

Pinwheel Straws: $3

Paper straws have become very popular recently and I love them (and they are cheap)! I use them so frequently, even when drinking water. They add a little pizazz to whatever I’m drinking (and I just think they’re really cute!). When I saw these I knew I had to buy them! The pinwheels are just so happy!  


Tassel Banner: $3

Another item that is very popular as well are tassel garlands. I actually have a pink and gold one I made hanging above my bed. They are so cute and can add a little something extra to a classroom, bedroom, or party!


Cupcake Liners and Toppers: $3

I love cupcakes! They can turn any frown of mine upside down. These ones are Valentine themed. I love the little topper that says “Made with Love” on them. With the right frosting and these cupcake liners and toppers, you’ll get ooo’s and ahh’s with how cute they are!

Statement Necklace: $16.99

The right necklace can really pull together an outfit. I love to accessorize! I enjoy finding nice pieces of jewelry that are both cute and functional. This one from Target is not too expensive and can be worn with multiple outfits to add that extra pop of color! I believe it is also available in cream.


Notecards: $12.95

Normally, I would never spend that much on notecards (unless they were monogrammed); however, these were cute! I actually did not buy them because I had already picked out a few things to spend my gift card on, but I just thought I would share.


Movies: $13-$14.99

Both of these movies are great, but totally different. My school showed The Intern and I loved it! Robert De Niro plays the sweetest, most chivalrous old man. I was so impressed with the movie that I had to buy it! American Sniper is also a very good movie. It is the story of Chris Kyle, and his endeavors for freedom, life, and love. This movie has a completely different tone compared to The Intern, but still good nonetheless. 


I was going to include some pieces of clothing, but after trying them on I decided not to. I love Target clothes! Before Thanksgiving break, I found a cute swing/shift dress that I wear all of the time. I love dresses, so I am always looking to find a new cute one that is good for my budget!

Now you have plenty of ideas for things under $30 at Target for gifts or even yourself! Just make sure you don’t overspend, as that is easy to do with so many cute things to buy. Thanks for reading and be looking forward to another post soon!

Saturday, January 16, 2016

Back to School Desk Organization.


Since I’m back at school I figured it was about time to organize myself for some clarity of mind. All of last semester I wanted to reorganize my desk, the shelf above it, my printer cart, and get rid of stuff that I no longer needed. For some reason I never got around to doing any of those things as much as I wanted to. Finally, I did it! I took some before and after pictures to show you how I organized everything.


First, I took everything out of my desk drawer and off the shelf and spread it out on my bed. Then I slowly (very slowly) went through things and threw away stuff. Sometimes you just have to be “heartless” in throwing away things because you shouldn’t keep everything. Some of the best advice I have received over the course of my life is that 1) Less is more and 2) Give yourself a new perspective and then purge some things.


Next, I hung up some cute decorations that I got from Hobby Lobby (my favorite). This whole organization project cost me less than $10, which is great when shopping on a budget. Each of the types of ribbons were each 99 cents, the mini clipboard was $2.99 with the 40% off coupon, the mini chalkboard was $2.99, the kraft paper bunting was on sale too, and the plastic bins were only a dollar from the Dollar Tree. I took some pink ribbon and made a “cornice” to cover the light attached to the bottom of the shelf. Then I measured, cut, and hung up the ribbons on my bulletin board. I loved the transformation that was happening to my desk even after adding these small things.


After I added all of my decorations, I used the white plastic bins from the dollar store to organize my stationery (which I had more than I thought I had!) and some extra supplies. I usually keep my makeup bag, deodorant, and hair gel on my desk just because it is more convenient than having to get up multiple times. After I put everything in the bins I tied two pink ribbons on the handles. I like making ordinary things cute with a little something extra.


My desk drawer used to house a variety of things, but now it’s organized and lovely. First, I laid down some contact paper so make it prettier than plain desk drawer. Then I organized my things inside. The left side is for my laptop, which sits on top of my laptop case. The right side of the drawer has a Lucite organizer tray for sticky notes, pencils, pens, washi tape, scissors, etc.


For the final touches to my desk, I added some pictures, my jewelry holder, and my Bible, devotion books, and my prayer journal.

I keep my pearls and earrings on the top plate and my headbands on the lower plate.


I always keep my Essie nail polishes on my desk beside my macaron box from Paris. I also keep my bracelets, watch, and my monogram ring there as well. Hopefully, I can get a monogrammed jewelry dish soon.


I hung up some things on the wall as well. I didn't want to clutter my newly organized desk, so I decided to hang them up!


At school I have my own printer, which is great! Before my freshman year, I went to Ikea with my mom and we bought a few things for my dorm. One of the things I got was a light blue 3 tier cart. I usually keep my printer on top, textbooks in the middle, and various things in the bottom. After a full semester of needing to organize things, I finally did and it looks so much better. *An organized life is a happy life*


After organizing my desk and printer cart, I finally feel ready to conquer the semester! Thanks for taking the time to read my blog! I hope this post gave you some ideas for your own organizational adventures!